
For my previous blog post about ansible and my written ansible-playbook I’ve received some feedback and questions. I’ve decided to give you a short instruction how to install and configure ansible to start your own packet capture with my ansible-playbook tcpdump.yml.
Installation
For this purpose I am using a fresh created t2.micro AWS EC2 Instance.
The first requirement on Amazon Linux is to enable the EPEL repository. To do that I am opening the file “/etc/yum.repos.d/epel.repo” and change the parameter “enabled=0” to “enabled=1”.
Having that done, I am able to install ansible and all dependencies with the command “sudo yum install ansible“.
Too simple to be true.
To verify your installation you can check if the folder /etc/ansible/ exists with that content:
ls -ltr /etc/ansible

total 28

drwxr-xr-x 2 root root  4096 Nov 29 22:39 roles

-rw-r--r-- 1 root root  1016 Nov 29 22:39 hosts

-rw-r--r-- 1 root root 19155 Nov 29 22:39 ansible.cfg
With that steps done, we almost can start the tcpdump.yml ansible-playbook – finally 🙂
Configuration
First thing to mention is that for now I don’t care about ansible roles. You can read about roles in the ansible documentation.
Our first step is to open the “hosts” file in /etc/ansible/ and configure our destination servers.
In the “hosts” file you can add just hostnames or IP’s or you can create a group of your choice. In this example I show you how to add groups since I am interested in starting tcpdump on all nodes in a cluster to the same time.
#AWS instance and my tcpdump-it.com webserver

[webserver]

173.212.216.192

172.31.19.161
Next step is to add / enable some parameter in the ansible.cfg configuration file. I do not go in details I will just show you my version which is working properly right now.
My configuration looks like this:
[defaults]

host_key_checking = false

log_path=/var/log/ansible/ansible.log
[ssh_connection]

ssh_args = -C -o ControlMaster=no -o ControlPersist=60s

scp_if_ssh=True
Now we are ready to run the ansible-playbook command!
I am creating a new folder inside /etc/ansible/ called “playbooks”. It could be your folder with all your ansible-playbooks.
Start your packet capture
I am executing git clone https://github.com/DanielSchwartz1/tcpdump and copy the tcpdump.yml file to my /etc/ansible/playbooks/ folder.
Finally: ansible-playbook tcpdump.yml --limit 'webserver' -u daniel -k
- With “–limit” I am specifying the group I’ve created in the hosts file.
- With “-u daniel” I am specifying the user name I want to connect with via SSH
- With “-k” ansible will ask me for the SSH password
You can also do all of it with SSH keys. For this arctile I’ve decided to use the way with user+pw.
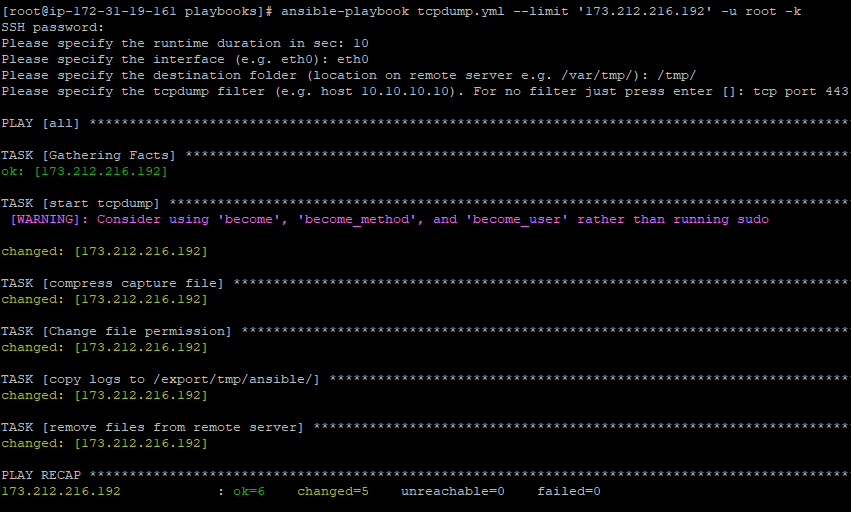
Here is the screenshot of the successful execution to one of my webserver (I used root just for this demo ;-)):
While this command was running on my AWS instance, I’ve double checked on my webserver if tcpdump is running:
# ps -ef | grep tcpdump

tcpdump 9741 9740 0 10:40 pts/1 00:00:00 /usr/sbin/tcpdump -G 10 -W 1 -i eth0 -s 0 -w /tmp//packet_capture_vmd17544_1518255638.pcap tcp port 443
After the playbook was finished, my /export/tmp/ansible/ folder on my AWS instance looked like this:
# ls -ltr /export/tmp/ansible/

-rwxr-xr-x 1 root root 12421 Feb 10 09:41 packet_capture_vmd17544_1518255638.pcap.gz
The playbook takes the tcpdump, zip it, change the file permission to be able to copy it, copy the logs to your server and delete the file finally from the remote machine.
Summary
I hope I was able to answer some of your questions and you feel ready to start your tcpdump with Ansible.
If you have problems, don’t hesitate to contact me.
If you want to know more about it, join my Slack Workspace or send me an email.
Stay up-to-date and subscribe to my Newsletter!
1 thought on “Install And Configure Ansible To Start Your Packet Capture”